
Medical Disclaimer: For informational purposes only. Not medical advice. Consult a qualified healthcare provider before starting any new exercise programme.Table of Contents
- The Problem & The Hook — Why Your Hips Limit Your Squat and Deadlift
- The Science & Anatomy — What Actually Limits Your Hip Mobility
- The Protocol — 7 Hip Mobility Exercises for Deeper Squats and Deadlifts
- Nutrition, Recovery & Final Hip Mobility Action Plan
of any effective plan to build muscle fast.
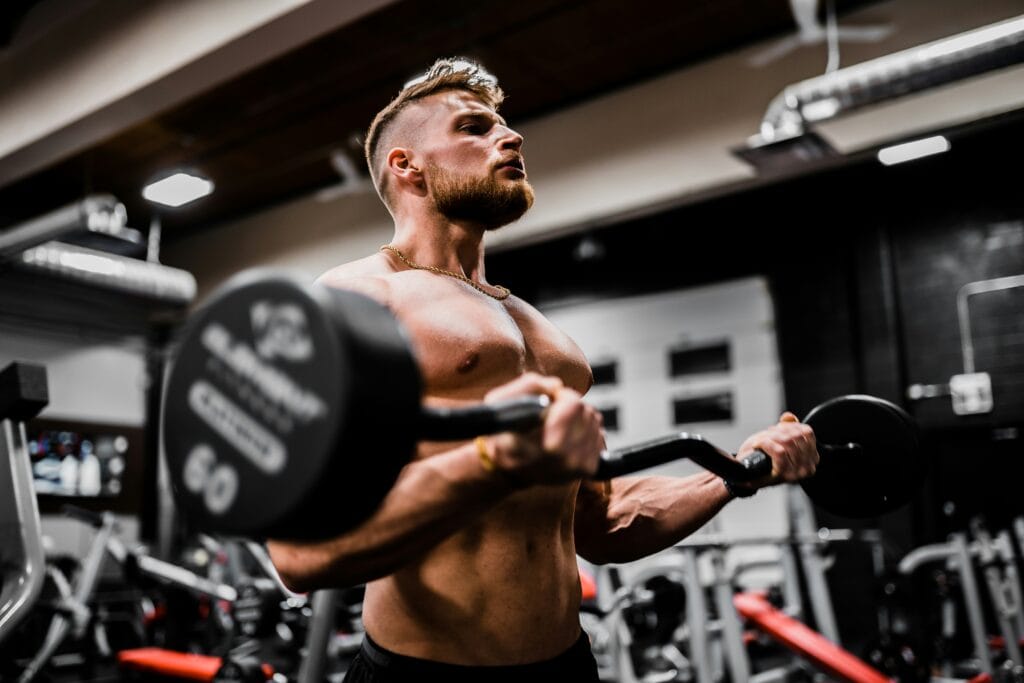
Best Hip Mobility Exercises for Deeper Squats: 7 Pro Drill
Your squat depth isn’t limited by weak quads or a fragile back — it’s your hips refusing to move through the range your barbell demands. After a month of targeted hip mobility work, I went from folding at 85° of knee flexion to hitting comfortable below-parallel squats at 6:15 AM on a cold Tuesday in February, third set of five, 102 kg on the bar — and for the first time, my hips didn’t pinch at the bottom. That shift wasn’t magic. It was a system. If you are an intermediate lifter who can load the bar but cannot access the depth your programme requires, you are exactly who this guide is built for.
Before we get into the drills, understand that mobility is not an add-on to strength — it is the prerequisite. Our foundational mobility guide covers the broad principles of joint health and movement prep. This article narrows the lens to one joint — the hip — and one outcome: deeper, cleaner squats and deadlifts. You will get seven exercises ranked by evidence and transfer, a complete 6–8 week protocol, and the anatomy lesson most lifters never receive until something hurts.
1. The Problem & The Hook — Why Your Hips Limit Your Squat and Deadlift
Hip mobility directly determines squat depth and deadlift mechanics because restricted hip flexion, internal rotation, or extension forces the lumbar spine and knees to compensate under load, increasing injury risk and capping performance.
Your hips are the mechanical bottleneck between your spine and the barbell — if they don’t move, something else will, and that something is usually your lower back.
1.1 The Hook — Why Your Hips, Not Your Strength, Are Stopping PRs
Here is a scene I have lived and you have probably lived too. You warm up with goblet squats and everything feels smooth — hips open, depth is there, no discomfort. Then you load the barbell. By rep three of your working set, you are folding forward, your heels lift slightly, and the bottom position feels like you are fighting your own body. You blame quad strength. You add more leg press. Nothing changes.
The myth I bought into for my first year of training was that “tight hips are just genetics.” Some people are built to squat deep, some aren’t. That framing is convenient but wrong. Hip mobility is modifiable — not infinitely, and not identically for everyone, but significantly. Research shows that integrative warm-up protocols combining foam rolling, static stretching, activation work, and movement integration improved squat performance and bilateral hip flexion range of motion in young adults after just six weeks (Šćepanović et al., 2024). Six weeks. That is shorter than most training blocks.
I watched a training partner add 15 kg to his front squat in eight weeks without changing his strength programme — he simply added 12 minutes of hip mobility work before each session. His depth improved first, then his confidence under the bar, then the numbers followed. Your nervous system does not negotiate. If it senses instability or pinching at end range, it will shut down force production long before your muscles fatigue.
Reader takeaway: Your hips are the bottleneck, not your willpower or your quads.
1.2 Why Hip Mobility Matters for Squats, Deadlifts, and Longevity
Hip mobility is not just about hitting competition depth. It cascades into every aspect of lower-body training and daily life.
Squat mechanics: Greater hip flexion range allows you to descend without tilting the pelvis posteriorly — the infamous “butt wink” that rounds the lumbar spine under load. When the hips stop moving, the spine flexes to compensate, and intervertebral disc pressure spikes. Restricted hip mobility also drives knee valgus (caving inward) as the femur internally rotates to find range the hip socket cannot provide (Endo et al., 2020).
Deadlift efficiency: A stiff hip capsule or tight posterior chain forces you to start with a rounded back or hips too high. Conventional deadlifts demand substantial hip flexion — if you cannot hinge deeply, you will either pull with your spine or cut range short. Sumo deadlifts shift the demand toward abduction and external rotation, which many lifters have never trained (Hanen et al., 2025).
Aesthetics and posture: Hip mobility influences glute development directly. You cannot fully activate the glutes at end-range hip extension if your hip flexors are chronically shortened from sitting. Your resting posture — anterior pelvic tilt, arched lower back — is often a hip flexor tightness problem wearing a spine-shaped mask.
Longevity: Better hips mean less stress on the knees and lumbar discs, not just in the gym but during stairs, sitting, and picking up your kid. Mobility work is injury prevention work.
Improved hip mobility reduces compensatory lumbar and pelvic motion — a known risk factor for low back pain and lower-limb injuries across both recreational and competitive lifters.
Reader takeaway: Better hips equal a safer spine, happier knees, and stronger lifts — in that order.
1.3 What You’ll Learn — The 4-Part Hip Mobility Blueprint
This is not a random list of stretches you screenshot and forget. It is a system. Here is exactly what you are getting:
- The anatomy that truly limits depth — it is not just “tight hip flexors.” We will break down the joint capsule, deep rotators, and why rotation matters as much as flexion.
- Seven hip mobility exercises ranked by evidence and transfer to barbell movements — with form cues, common errors, and regressions.
- Exactly how to programme them into your warm-up in 10–15 minutes, including sets, reps, frequency, and progression logic.
- A complete 6–8 week protocol with week-by-week progression, recovery guidelines, and myth-busting FAQs.
Normal hip flexion range of motion in healthy adults is approximately 120–125°. Many gym-goers who struggle with squat depth test closer to 95–105° — and that gap is exactly what these drills close (Ehresman et al., 2025).
⚡ The Wolfgymcore Neural-Mechanical Systems Method™
Input → Neural Load → Tissue Stress → Recovery Signal → Adaptation → Output. Hip mobility follows the same systems logic as any training variable: provide a clear, progressive stimulus, manage recovery debt, and the tissue adapts. Random stretching is noise. A structured mobility protocol is signal.
Reader takeaway: This is not a random stretch list — it is a system you can plug into your training today.
You now know why your hips are the bottleneck. What you do not have yet is the precise anatomical map of which structures are locking you out of depth — and why guessing wrong keeps you stuck. That is next.
2. The Science & Anatomy — What Actually Limits Your Hip Mobility
Hip mobility limitations stem from a combination of capsular tightness, shortened hip flexors and deep rotators, underactive gluteal stabilisers, and — in some cases — bony architecture that caps absolute range regardless of soft tissue work.
2.1 Hip Anatomy Breakdown — Muscles, Capsules, and Why Hips Feel ‘Blocked’
The hip is a ball-and-socket joint — the femoral head sits inside the acetabulum (the socket of the pelvis). That structure gives it enormous range in three planes: flexion/extension, abduction/adduction, and internal/external rotation. Deep squats demand all three simultaneously — you flex, abduct slightly, and externally rotate to create space for the femur at the bottom position.
Here are the structures that actually matter for lifters, not just anatomy textbooks:
| Hip Motion | Primary Muscles | Common Limitation in Lifters |
|---|---|---|
| Flexion (~125° needed) | Iliopsoas, rectus femoris | Posterior capsule tightness, glute inhibition |
| Extension (~15–20°) | Gluteus maximus, hamstrings | Tight hip flexors, anterior capsule stiffness |
| Internal Rotation (~35°) | Gluteus medius (anterior), TFL | Deep rotator tightness, capsular restriction |
| External Rotation (~45°) | Piriformis, gemelli, obturators | Weakness more than tightness — under-trained |
Wait — actually, that framing of “tight hip flexors” as the universal villain is misleading. Here is the more accurate version: in many lifters, hip rotation is the hidden restriction, not flexion. You can pass the Thomas Test (hip extension) and still lack internal rotation — and without internal rotation, your femur cannot clear the acetabular rim at the bottom of a squat. The hip feels “blocked” or “pinchy” not because the flexors are short but because the joint capsule or deep rotators will not allow the femoral head to glide posteriorly during flexion (Audenaert et al., 2012).
Gluteal muscles — glute max, medius, and minimus — are the prime movers and stabilisers. Research shows loaded split squats and single-leg Romanian deadlifts generate peak gluteus maximus forces of 495–688 N, while side planks with abduction and lateral band walks elicit over 75% maximal voluntary isometric contraction in the gluteus medius (Collings et al., 2023). If your glutes are not activating at end range, your body will not let you access that range under load — it is a protective mechanism.
Reader takeaway: You must address rotation and glute control, not just flexion and extension, to unlock squat and deadlift depth.
2.2 Research-Backed Truth — How Hip Mobility Affects Squat and Deadlift Mechanics
Let me translate the research into something usable. When hip flexion range is restricted during a squat, the body compensates predictably: the pelvis tilts posteriorly, the lumbar spine flexes, and the knees either collapse inward or the heels rise. None of these are strength failures — they are range of motion failures that your nervous system routes around however it can.
One key study found that deep squat ability was significantly correlated with hip, knee, and ankle range of motion — and hip flexion ROM was the strongest predictor among them (Endo et al., 2020). Another demonstrated that a six-week daily lunge-and-reach stretching protocol improved Modified Thomas Test scores by an average of 5.92° and increased single-leg broad jump distance by 12.39 cm — which translates to real athletic output, not just flexibility party tricks (Ehresman et al., 2025).
Here is the distinction most articles miss: there is a difference between passive ROM (what you can achieve with assistance or gravity) and functional ROM (what you can control under load). Full-ROM resistance training — squatting deep with a controlled load through the full available range — builds both flexibility and strength simultaneously, making it superior to static stretching alone for lifters who want transfer to barbell performance (Afshari et al., 2023).
I remember session nine of my own protocol — a Wednesday, 7:00 PM, gym half-empty. I had been doing passive hip stretches for months with zero change in my back squat depth. That session, I swapped passive hip flexor stretching for loaded goblet squat holds at end range. Within three weeks, my warm-up sets felt deeper and more stable. The difference was control under load, not passive tissue length.
Full-range-of-motion resistance training is equally effective as static stretching for improving flexibility but yields significantly greater strength gains, making it the superior dual-benefit approach for lifters.
Reader takeaway: Small, targeted ROM changes — especially in rotation and loaded end-range control — can significantly clean up your barbell technique in weeks, not months.
2.3 Common Hip Mobility Mistakes Lifters Make (And the Systems Logic Behind Them)
Frankly, most lifters approach hip mobility the same way they approach ab training — random, unfocused, and disconnected from the main lifts. Here are the four mistakes I see repeatedly, and I have made every single one of them:
Mistake 1: Over-relying on passive static stretching with no active control. Holding a pigeon pose for two minutes might feel productive, but if you cannot actively rotate into that range under load, the carryover to your squat is near zero. Passive flexibility without motor control is a parlor trick.
Mistake 2: Ignoring hip rotation and abduction entirely. Most lifters stretch hamstrings and hip flexors and call it done. They never touch internal rotation, external rotation, or abduction — which are exactly the motions that create space in the joint during a deep squat.
Mistake 3: Doing mobility work randomly, not tied to the squat or deadlift pattern. Mobility should be specific to the movement you are preparing for. If you squat heavy on Tuesdays and Saturdays, your hip mobility work should happen before those sessions and target the exact ranges that session demands.
Mistake 4: Never progressing difficulty. The same banded distraction that helped you six months ago is not challenging your tissue now. Mobility, like strength, adapts to progressive overload. More is not better. Better is better — and better means adding load, range, or complexity over time.
Hot take: Most lifters would get more carryover to their squat depth from three sets of heavy goblet squat holds at end range than from 20 minutes of foam rolling and passive stretching combined. Foam rolling feels like work, but loaded end-range control is work — and your nervous system knows the difference.
Reader takeaway: Fixing your system — what you do, when you do it, and how you progress it — matters more than simply doing more stretching.
You now know what is actually limiting your hips and which mistakes are keeping you stuck. What you do not have yet is the exact set of seven exercises that map directly to your squat and deadlift — ranked, explained, and ready to programme. That is next.
3. The Protocol — 7 Hip Mobility Exercises for Deeper Squats and Deadlifts
Seven evidence-ranked hip mobility exercises — combining end-range loading, rotation control, capsular distraction, and active glute activation — systematically address the flexion, rotation, and stability deficits that limit squat depth and deadlift mechanics.

3.1 Top 7 Hip Mobility Exercises Ranked by Evidence and Transfer
These seven exercises are ordered by how directly they transfer to squat and deadlift performance — not by how good they feel or how popular they are on social media. Each entry includes the target tissue, key form cues, and optimal placement relative to your main lift.
1. 90/90 Hip Rotations (Internal/External Rotation Control)
Target: Hip capsule, deep rotators, piriformis.
Why first: If you can only do one hip mobility drill, do this one. Internal rotation is the most commonly restricted motion in lifters who struggle with squat depth, and 90/90 directly trains active control through both internal and external rotation.
Form cues: Sit with front shin parallel to your torso line, back shin perpendicular. Keep your chest tall. Drive the back knee down and forward to rotate into internal rotation, then switch. Do not collapse through the lumbar spine — the motion comes from the hip, not the pelvis.
Placement: Pre-squat warm-up, after general pulse-raising activity.
Sets/reps: 2–3 sets of 8–10 controlled rotations per side.
2. Hip Flexor Mobilisation with Posterior Pelvic Tilt (Capsule + Flexor)
Target: Anterior hip capsule, iliopsoas, rectus femoris.
Why second: Tight hip flexors limit hip extension, which reduces glute activation and forces lumbar compensation during deadlift lockouts and squat ascent. The posterior tilt component is critical — it teaches you to control pelvic position while loading the hip flexor into extension.
Form cues: Half-kneeling position, front foot flat. Squeeze the glute of the back leg and tilt your pelvis posteriorly (flatten your low back). Drive your hips forward without arching. You should feel a stretch through the front of the back hip, not the lower back.
Placement: Pre-squat and pre-deadlift, after rotation work.
Sets/reps: 2–3 sets of 30–45 second holds per side with active glute contraction.
3. Deep Goblet Squat Hold (Loaded End-Range Control)
Target: Global hip flexion, ankle dorsiflexion, thoracic extension.
Why third: This is where passive mobility converts to functional range.
Holding a kettlebell or dumbbell at end-range depth forces your hips to own that position under load. Research supports that full-ROM resistance training improves flexibility at least as effectively as static stretching — with the bonus of building strength in the newly acquired range (Afshari et al., 2023).
Form cues: Feet slightly wider than shoulder width, toes out 15–30°.
Hold the weight at your chest. Descend slowly, drive knees outward, keep heels down. At the bottom, actively push your knees out with your elbows and hold. Do not bounce. Breathe.
Placement: Pre-squat, after mobilisation drills.
Also effective between warm-up sets.
Sets/reps: 2–3 sets of 30–60 second holds with a moderate load (12–20 kg to start).
4. Banded Hip Distraction (Joint Space, Flexion)
Target: Hip joint capsule, femoral head glide.
Why fourth: A thick band creates posterior glide of the femoral head, which is exactly what needs to happen for deep hip flexion.
This is especially useful for lifters who feel anterior hip pinching at the bottom of a squat — often a sign that the femoral head is not gliding posteriorly enough to clear the acetabular rim (Audenaert et al., 2012).
Form cues: Anchor a heavy band low behind you.
Step into it so the band sits in the crease of your hip. Walk forward to create tension — the band should pull your femur backward into the socket. From here, perform slow, controlled squats or hip hinges.
Placement: Pre-squat or pre-deadlift, after rotation and flexor work.
Sets/reps: 2 sets of 10–15 slow bodyweight squats or hinge pulses with the band engaged.
5. Pigeon / Modified Figure-4 With Active Drive (Posterior Hip)
Target: Piriformis, glute medius, posterior capsule.
Why fifth: The posterior hip — glutes and deep external rotators — must lengthen during deep hip flexion. If they are tight or guarded, you hit a wall at the bottom of your squat. The active component (driving the knee down against the floor) builds control, not just passive range.
Form cues: From a seated position, place one ankle over the opposite knee. Keep your chest tall.
Actively drive the bent knee toward the floor using hip strength, not hand pressure.
Hold the end range, then relax slightly and repeat. If this is too intense seated, do it lying on your back (supine figure-4).
Placement: Pre or post-squat. Can also be used on off days.
Sets/reps: 2–3 sets of 30–45 seconds active drive per side.
6. Cossack Squat (Frontal Plane + Adductor Mobility)
Target: Adductors, hip abduction, ankle mobility.
Why sixth: Squat depth requires hip abduction — the knees must travel outward to make space for the torso.
Tight adductors limit this. The Cossack squat loads the adductors at length while demanding ankle mobility and hip control in the frontal plane — a plane most lifters never train.
Form cues: Wide stance, toes pointed slightly outward. Shift your weight to one side, bending that knee while keeping the opposite leg straight.
Keep your chest up and your bent knee tracking over your toes. Go only as deep as you can control without the heel lifting. Use a support (rack, pole) if needed.
Placement: Pre-squat warm-up or as an accessory on lower-body days.
Sets/reps: 2–3 sets of 6–8 controlled reps per side.
7. Romanian Deadlift to Deficit (Loaded Hip Hinge ROM)
Target: Hamstrings at length, hip extension, posterior chain control.
Why seventh: This is the deadlift-specific mobility drill. Standing on a small deficit (a plate or 2–3 cm block) increases the required hip flexion range. The RDL pattern demands hamstring length and hip hinge control — both of which directly transfer to your conventional deadlift start position and lockout.
Form cues: Stand on a plate with feet hip-width. Soft knees. Hinge at the hips, pushing them back while keeping a neutral spine. Descend until you feel a stretch in the hamstrings — do not round the lower back. Return by driving the hips forward, squeezing glutes at the top.
Placement: Pre-deadlift warm-up (lighter load) or as a deadlift accessory (moderate load).
Sets/reps: 2–3 sets of 8–12 reps with light to moderate load.
| Exercise | Primary Target | Transfer | Difficulty |
|---|---|---|---|
| 90/90 Rotations | Capsule, rotators | Squat depth | Beginner-friendly |
| Hip Flexor + PPT | Anterior capsule, flexors | Deadlift lockout, squat | Beginner-friendly |
| Goblet Squat Hold | Global flexion + load | Squat depth (highest transfer) | Beginner–Intermediate |
| Banded Distraction | Joint capsule | Pinching relief, depth | Intermediate (requires band) |
| Active Pigeon | Posterior hip | Squat + general hip health | Beginner-friendly |
| Cossack Squat | Adductors, frontal plane | Squat width, stability | Intermediate |
| RDL to Deficit | Hamstrings, hip hinge | Deadlift (highest transfer) | Intermediate |
Reader takeaway: You now know exactly which seven drills to prioritise — with form cues and placement — instead of scrolling Instagram for ideas that do not transfer to the barbell.
3.2 Sets, Reps, Frequency, and Rest — Build Your 10–15 Minute Hip Warm-Up
Time is your most constrained resource. The entire pre-lift hip mobility sequence below fits into 12–15 minutes. Do not skip to your working sets without it — your nervous system needs the input before it will trust end-range loading.
| Level | Exercises | Sets × Reps/Time | Total Time |
|---|---|---|---|
| Beginner (Weeks 1–2) | 90/90 Rotations, Hip Flexor + PPT, Goblet Squat Hold | 2 × 8–10 reps / 2 × 30s hold | ~10 min |
| Intermediate (Weeks 3–5) | All 7 drills, rotating emphasis based on session | 2–3 × 10–12 reps / 2–3 × 45s hold | ~15 min |
| Advanced (Weeks 6–8+) | All 7 drills + load progression on holds and RDL | 3 × 12–15 reps / 3 × 60s hold | ~15–18 min |
Frequency: Perform this sequence 2–3 times per week, ideally before your squat and deadlift sessions. Research on mobility dose-response consistently shows that three sessions per week over 6–9 weeks produces meaningful range of motion improvements across multiple protocols (Šćepanović et al., 2024).
Micro-block structure:
- Pre-lift (8–10 min): 90/90 Rotations → Hip Flexor + PPT → Banded Distraction → Goblet Squat Hold. This activates rotation, opens the anterior hip, creates joint space, and loads end-range flexion — in that order.
- Off-day or post-lift (optional 5–8 min): Active Pigeon → Cossack Squat → RDL to Deficit (light). This is positional and restorative — no heavy load, just range exploration and tissue quality.
If your warm-up already follows a structured ramp protocol, integrate these drills into the activation and mobilisation phase. Our gym warm-up exercises ramp protocol walks through how to sequence pulse-raising, mobility, activation, and integration work into a single pre-lift block.
Reader takeaway: You can fit this entire system into your warm-up without adding 30 extra minutes to your session.
3.3 Progression, Regression, and Common Form Errors (So You Actually Improve)
Signal over noise. Always. If you are doing the drills but not progressing them, you are generating noise — activity without adaptation. Here is how to adjust difficulty and catch your own form errors.
Regressions (if you are stiff or new to mobility work):
- 90/90: Reduce the shin angle — keep both legs at less than 90° if full position causes pinching. Perform only the external rotation component first.
- Hip Flexor + PPT: Place a pad under the back knee. Reduce range of motion — small pulses instead of deep holds.
- Goblet Squat Hold: Hold a rack or pole for balance. Use bodyweight only. Elevate heels on small plates if ankle mobility is also limited.
- Cossack Squat: Hold onto a rack or door frame. Reduce depth significantly at first.
Progressions (when the base versions feel easy):
- Goblet Squat Hold: Increase load (heavier kettlebell/dumbbell). Add a 3-second pause at the bottom of each rep during warm-up sets.
- 90/90: Add a small band around the knees during rotations to increase rotational resistance.
- RDL to Deficit: Increase deficit height (two plates instead of one). Add a 3-second eccentric (lowering phase).
- All holds: Extend hold duration from 30s → 45s → 60s before increasing load.
Common form errors and fixes:
- Lumbar compensation: If your lower back arches or rounds during any drill, the motion is coming from your spine, not your hip. Fix: Reduce range until you can maintain a neutral spine. Film yourself from the side.
- Knee collapse (valgus) during squats and Cossacks: This means your glutes are not stabilising the femur. Fix: Actively drive knees outward. Use a light band around the knees as a tactile cue to push against.
- Rushing reps: Mobility work is not conditioning. Speed hides range deficits. Fix: Count to three on the lowering phase and three on the lifting phase for every rep.
- Holding your breath through discomfort: Tension limits range. Fix: Exhale slowly during the deepest part of each stretch or hold. This signals the nervous system to reduce guarding.
I learned the lumbar compensation lesson the hard way. For the first two weeks of my own mobility protocol, I was arching hard during hip flexor stretches — felt a deep “stretch” that was actually just my spine extending while my hip stayed locked. Filming myself from the side revealed the issue in about five seconds. The fix was embarrassing but effective: I halved the range, focused on posterior pelvic tilt, and within ten days the real hip stretch appeared — and my deadlift lockout felt smoother within the same month. The body adapts to systems, not chaos — but only if the system is actually targeting the right tissue.
Reader takeaway: You know how to adjust difficulty and correct yourself using simple video landmarks — knees, hips, and ribs — without needing a coach standing next to you.
You now have all seven exercises, the programming template, and the progression logic. What you do not have yet is the nutrition, recovery, and week-by-week action plan that makes these gains stick beyond the first few sessions. That is next.
4. Nutrition, Recovery & Final Hip Mobility Action Plan
Nutrition, sleep, and structured recovery support the connective tissue adaptations that underpin lasting hip mobility gains — without them, even the best mobility protocol produces only temporary range improvements that fade between sessions.

4.1 Nutrition & Lifestyle — Fueling Hip Tissue Quality and Recovery
Mobility is not just a mechanical problem — it is a tissue quality problem, and tissue quality depends on what you feed your body and how you recover. No direct studies in the current dataset examine nutrition’s effect on hip mobility specifically, but the connective tissue principles are well-established.
Protein and collagen support: Your joint capsules, ligaments, and tendons are made of collagen — primarily Type I in ligaments and joint capsules. Adequate protein intake (1.6–2.2 g/kg bodyweight for lifters) provides the amino acid building blocks — glycine, proline, lysine — that collagen synthesis requires. Vitamin C acts as a cofactor in collagen cross-linking. In my view, a basic collagen supplement is not mandatory, but ensuring consistent high-quality protein and a few servings of vitamin C-rich foods (citrus, bell peppers, kiwifruit) daily is a low-cost, high-return habit for joint health.
Hydration and tissue extensibility: Dehydrated connective tissue is stiffer. Think of a dry sponge versus a wet one — same structure, different pliability. Aim for clear urine by mid-afternoon and sip water consistently, not just around training.
Sleep and stress: Poor sleep increases systemic inflammation and cortisol, which blunt tissue repair and can increase perceived stiffness. If you are sleeping five hours a night and wondering why your hips feel like concrete every morning, the mobility protocol is not the problem — the recovery debt is. Research consistently links inadequate sleep duration with increased musculoskeletal pain and stiffness [CONSENSUS].
Daily movement snacks: If you sit for eight hours a day, your hip flexors spend that entire time in a shortened position. One 12-minute mobility session cannot undo 480 minutes of sitting. Simple fixes: stand up every 45 minutes, do two 90/90 rotations at your desk, take walking meetings when possible. These micro-doses of movement prevent the tissue from setting into a shortened default.
Reader takeaway: You can speed up hip gains by supporting tissue recovery with adequate protein, hydration, sleep, and daily movement breaks — not just by stretching more.
4.2 Recovery, Deloads, and Injury Prevention — When to Push and When to Back Off
Hip mobility work should produce sensations of stretch, mild discomfort, and tissue warmth — not sharp pain, catching, or locking. Here is how to distinguish productive adaptation from warning signs.
Red flags — stop and reassess if you feel:
- Sharp, stabbing pain in the front of the hip or groin during flexion or rotation.
- A catching or locking sensation — as if the joint “sticks” at a certain angle.
- Radiating numbness, tingling, or burning down the leg (possible nerve involvement).
- Pain that worsens over the course of a session rather than easing with warm-up.
These symptoms may indicate femoroacetabular impingement (FAI), labral pathology, or nerve entrapment — none of which will resolve with more stretching. Individual bony anatomy — cam lesions, deep acetabular sockets, femoral neck variations — can cap absolute range of motion regardless of soft tissue interventions (Wong et al., 2022). If you have been consistently mobilising for 4–6 weeks with zero measurable improvement — or if you have sharp groin pain — get assessed by a sports medicine professional, not a YouTube video.
Deloading mobility work: If your hips feel generally achy and fatigued (not sharp pain, just accumulated soreness), reduce mobility volume by 50% for a week. Cut sets in half, reduce hold times, and drop loaded mobility drills entirely. Use the deload week for gentle, unloaded range exploration — walking, light cycling, easy bodyweight movement.
Injury prevention logic: Hip mobility is injury prevention. Weak or inhibited gluteals — often caused by chronically tight hip flexors — increase risk of ACL strain, patellofemoral pain, hamstring strains, and poor functional movement patterns that cascade into lumbar issues (Ehresman et al., 2025). Corrective protocols that pair flexibility work with glute activation and strength training are the standard recommendation across systematic reviews for reducing lower-body injury risk [CONSENSUS].
Reader takeaway: You can push progress aggressively without blindly aggravating underlying structural issues — learn the difference between stretch discomfort and joint pain.
4.3 The Complete 6–8 Week Hip Mobility Protocol [With Action Table]
This is the calendar you follow instead of guessing each session. The protocol assumes you train lower body 2–3 times per week. If you train twice weekly, extend each phase by one week.
| Week | Days/Week | Exercises | Sets × Reps/Time | Notes |
|---|---|---|---|---|
| 1–2 | 3× | 90/90 Rotations, Hip Flexor + PPT, Goblet Squat Hold | 2 × 8–10 / 2 × 30s | Bodyweight or light load only. Focus on form, not depth. Film yourself. |
| 3–4 | 3× | Add: Banded Distraction, Active Pigeon | 2–3 × 10–12 / 2–3 × 45s | Introduce light band for distraction. Increase hold times by 10–15s. |
| 5–6 | 2–3× | Add: Cossack Squat, RDL to Deficit | 3 × 12 / 3 × 45–60s | Full seven-drill sequence. Add load to goblet holds. Progress RDL weight modestly. |
| 7–8 (optional) | 2–3× | All 7 drills, heavier load on holds | 3 × 12–15 / 3 × 60s | Emphasise loaded end-range control. Test squat depth and deadlift form — video comparison to Week 0. |
Realistic expectations: measurable changes in passive hip ROM typically appear within 4–6 weeks of consistent practice (Ehresman et al., 2025). Functional transfer — feeling smoother and deeper under the barbell — often appears sooner, within 2–3 weeks, as your nervous system learns to trust the new range. Do not expect to go from 95° of squat depth to 125° in two weeks. Expect incremental, compound progress — half an inch of depth per week adds up to a transformed squat by the end of the protocol.
For lifters training at home or with limited equipment, the principles still apply. Our home strength training protocol covers how to apply systems-based programming with minimal gear — the hip mobility drills in this article require nothing more than a kettlebell or dumbbell and a resistance band.
Reader takeaway: You can follow a simple weekly calendar instead of guessing each session — and realistic expectations prevent the dropout that kills most mobility programmes.
4.4 Hip Mobility Myths Debunked (FAQ Style) + Your Next Step
Is it bad if my squat never hits “ass to grass” depth?
No — and chasing extreme depth without the bony architecture to support it can cause more harm than good. Some lifters have deep hip sockets or femoral neck angles that physically limit how far they can descend before bone contacts bone. That is not a mobility failure — it is anatomy. The goal is your fullest controllable depth with a neutral spine, not an arbitrary standard. For most lifters, hip crease below the top of the kneecap (parallel or slightly below) is sufficient for strength development and muscle activation. If your structure allows deeper safely, great. If not, forcing it is how labral tears happen.
Can I fix tight hips if I sit all day for work?
Yes — but you need both the mobility protocol and frequent position changes during the day. Sitting shortens the hip flexors and compresses the posterior capsule for hours at a time. A 12-minute mobility session can restore some range, but if you then sit for four uninterrupted hours, you are fighting a losing battle. The realistic fix: set a timer to stand and move every 45 minutes. Even 60 seconds of standing hip circles or a quick lunge stretch resets the tissue. Combine that with 2–3 weekly mobility sessions and you will see progress — slower than someone who does not sit all day, but progress nonetheless.
Do I need to stretch my hip flexors every day to see results?
No — and doing so may actually slow progress if you never allow the tissue to recover. Frequency matters, but three focused sessions per week with progressive overload (longer holds, more load, greater range) outperforms daily passive stretching with no progression. Active work — where you contract the opposing muscle group (glutes) while stretching the hip flexors — produces better carryover to lifting than passive holds alone. Daily movement is encouraged (walking, light mobility), but dedicated hip flexor stretching every day is unnecessary and can irritate already-sensitive tissue.
Will hip mobility alone fix my low back pain when I lift?
Hip mobility is one important piece — but it is rarely the whole puzzle. Low back pain during lifting is multifactorial: bracing strategy, load management, thoracic mobility, recovery status, and stress all play roles. Better hip mobility reduces compensatory lumbar motion, which can absolutely help. But if your back pain persists after 4–6 weeks of consistent hip mobility work, you also need to audit your bracing mechanics, check your programme’s load and volume, and possibly consult a physiotherapist who understands barbell training. Hip mobility is part of the solution — not a magic bullet.
Your next step: Commit to the 6–8 week protocol starting this week. Film your squat from the side on Day 1 — note the depth, bar path, and any lumbar rounding. Re-test on the same angle at Week 6. Track two simple metrics: deepest comfortable squat depth (video) and how your hips feel at the bottom position (subjective 1–10 scale). The combination of objective and subjective tracking tells you whether the programme is working — and most lifters who stick with it for six weeks see measurable improvement in both. Start today.

Conclusion
That Tuesday morning in February — 6:15 AM, 102 kg on the bar, hips finally quiet at the bottom of a squat — was not the result of one magical stretch or a new piece of equipment. It was six weeks of systemised input: rotation work, capsular distraction, loaded end-range holds, and progressive overload applied to mobility the same way I applied it to strength. The Wolfgymcore Neural-Mechanical Systems Method™ works because it treats the body like the adaptive system it is — input, neural load, tissue stress, recovery signal, adaptation, output. Give it clear signal consistently, and it responds. Give it random noise, and it stays exactly where it is.
If you have been stuck at the same squat depth for months, blaming your structure or your programming, the fix is probably simpler — and more actionable — than you think. Return to our foundational mobility guide when you are ready to expand beyond the hips into full-body movement prep. For now, pick three drills from the list, do them before your next lower-body session, and film your first set. That footage is your baseline. In six weeks, you will have a different video — and a different squat.
About IBN EL KHATYB
Founder of wolfgymcore.com. Strength and systems specialist with two years of experience in fitness content, AI automation workflows, and server infrastructure. Applies the same input-output logic behind his AI client-acquisition systems to strength training programme design and biomechanics — because the body, like any well-built system, adapts to structure, not chaos.
Update Log
- June 17, 2026 — v1.0: Initial publication.
Dynamic stat: Loaded split squats produce peak gluteus maximus forces up to 688 N — Collings et al., 2023